


Countdown to War Planner: The Multi-Domain Strike Planner
 Command’s “War Planner” update (aka “Tiny”) is set to release in less than a month. Are you ready for Command’s biggest update yet?
In this multi-part series we take a look at the various key features introduced in this massive, FREE upgrade to Command.
Today we are looking at arguably the War Planner’s most anticipated new feature: The Multi-Domain Strike Planner.
In this series:
- Overview
- General Improvements and User Interface
- The Operations Planner and multi-missioned units
- The Multi-Domain Strike Planner
- Cargo 2.0 – The Logistician’s Nirvana
- Simulation Additions & Improvements
The Multi-Domain Strike Planner
Throw away your planning spreadsheets! You asked/begged/hostaged family members for it, and now it’s here. Coordinate massive, complex strike missions with time-on-target, complex flight plans (incl. in-flight refueling) , multiple attack patterns and multi-domain strike combinations. “Bringing everything together on a strike is just too complex/difficult” is officially over as an excuse. If you don’t master this, your adversary most definitely will.
Poolside party: Task Pools
You have 8 bases across your scenarios, in every base there are 5 B-52 Stratofortress, and you want to assign a specific set of missions to a specific subgroup of those Buffs. Sounds painful?
No more!
With the brand-new Task Pool feature you can now easily create logical clusters of units and be able to operate them effortlessly in a large scenario like never before.
From the new and improved Mission Editor (F11)
Select Add,
from the popup select Task Pool,
then assign a name to the Task Pool just created:


You will now see the Task Pool just created (light blue circular symbol), the list of available units (round shaped green rectangle) and the list of units assigned to the Task Pool (orange rectangle).
Press the Arrow shaped buttons to manage the units into the Task Pool:

4 B-52s are added to the Task Pool just created:

This will let you quickly assign one or more Packages to those aircraft, allowing you to rapidly access to this specific set of units without having to search for them in your scenario.
This feature can be viewed like a more nuanced and detailed version of “Control Groups”, that are available in a large quantity of modern RTS. Task Pools let you create a cluster of units that are not forced to work together in any way, giving you a new way of interacting with multiple units at the same time.
Going the extra mile: Packages
The concept of Packages is deeply connected to the concept of Task Pool. Once you create a Task Pool, you can define one or more Packages to be executed exclusively by those units.
This link is immediately defined when you create a Package. In Mission Editor, click on Add and select Packages. Here, you’ll need to define a Name and a Parent Pool, like in the image below:

You will now see the Package just created as a child of the Task Pool (light blue circular symbol), the list of units that are in the parent Task Pool, (round shaped green rectangle) and the list of units assigned to the Package (orange rectangle):


As before, you can press the Arrow-shaped buttons to manage the units into the Package.
You can interact with the Packages just like you would in a normal Mission. Expect every functionality to be the same, and every setting to work exactly in the same way. The only limitation would be that only units from the parent Task Pool can be assigned to the target Package. The Task Pool is acting like a filter, lifting the encumbrance of having to look for that specific subset of units every time you need it.
30 mins or the next one’s free: Time On Target (TOT) and Take/Off Time
Do you need a specific place to be blown exactly at 18:00:00 ?
We got you covered!
With the new TOT feature you will be able to schedule precise multi-domain Package in minute detail.
After creating a Strike Mission or Package, added the desired units and defined a target, you can now define a Time On Target (TOT) (light blue circle); then, click on CREATE or UPDATE flightplans (green rounded square):

The simulation has now created a detailed Flightplan for all the units involved in the Mission, taking into account the inserted time constraint. This Flightplans are visible from the Flightplan Editor Accessible from the appropriate button (orange square).
Let’s analyse the Flightplan Editor in detail:

In the light blue circle, you can see the Flight name.
On the map, the Flightplan is visible as shown into the orange square.
Every Waypoint is shown in complete details, and you can examine and change type, time and speed of every Waypoint, as long as the physical constraints are respected.
You can also add or move most of the Waypoint. Every change is reflected in real time on the game map and vice versa, giving you complete freedom when customizing your Flightplans.
The TOT constraint is a multi-domain element that lets you precisely synchronize complex multi-domain strikes: Just add another type of unit to the mission with a TOT assigned, and every unit will hold its weapon until the firing time comes. The firing time is constantly re-evaluated and takes into account if the target or the firing unit moves.
In the example below, the aircraft has taken off at the expected Take-Off Time and will arrive on target at the expected TOT, but the ship did not fire yet:

The ship fired its weapon according to the weapon ETA:
and the weapons reached the target at the common expected TOT:

Seven sim-seconds after this screenshot was taken, both the string of iron bombs (notice the aircraft that released them is already breaking clear) and the ship-launched cruise missiles impacted concurrently on their targets.
Any which way you can: Attack Methods
You can define a wide array of attack patterns for your air strike, including – but not limited to – Multi staked TOT with various degrees of separation, single axis and split action. This will let you further customize your strike plans without the need to manually define those attack manoeuvres every time:

As with the flight planner, every Waypoint can still be dragged and customized as seen fit.
A sip in mid-air: Air-to-Air Refuel (AAR) Scheduling
This is a more advanced topic and one of the most requested features.
In the screenshot below, a Task Pool and a Package were created alongside a Support Mission:

From the Flightplan Editor of the Strike Package, Waypoint Number 7 (on the Egress leg of the flight) was selected and a new Waypoint was added. The added Waypoint (generated as the 8th one of the route) default type is “turning point” but it was redefined as a refuel point:

As soon as the Waypoint 8 is reached, the aircraft that are part of the flight will head toward the tanker and be refueled.
Countdown to War Planner: The Operations Planner and multi-missioned units
 Command’s “War Planner” update (aka “Tiny”) is set to release in less than a month. Are you ready for Command’s biggest update yet?
In this multi-part series we take a look at the various key features introduced in this massive, FREE upgrade to Command.
Today we are looking at one of the new headline features of War Planner: Multi-missioned units and the Operations Planner.
In this series:
- Overview
- General Improvements and User Interface
- The Operations Planner and multi-missioned units
- The Multi-Domain Strike Planner
- Cargo 2.0 – The Logistician’s Nirvana
- Simulation Additions & Improvements
The Operations Planner
Ever wished you had an ATO-like overview of all missions and operations planned or currently executing, their status and hierarchical priorities and dependencies? With units or even entire task forces automatically switching from one mission to the next as objectives are achieved? Wish no more. The brand-new Operations Planner makes this, and much more, a reality.
To fully comprehend this function, it is essential to have a good knowledge of the mission editor in general, and cargo missions in particular. Previously, in Command, a given unit could only be assigned to a single mission. If you wanted to assign the unit to another mission, you would have to manually unassign it from the current mission and then assign it to a new one.
Before we begin: Some nomenclature
Triggers
A trigger in the operations planner is a condition that gets checked each simulated second. If the conditions are met the trigger will execute a specific action. There are two possible actions: start a mission or tag a mission as satisfied.
 Mission status
A mission’s status in Command can be either Active or Inactive.
Active means the mission is evaluated by the Command simulation, but it doesn’t necessarily mean that the mission serves a purpose or has units assigned to execute it.
Inactive means that the mission is completely ignored by the simulation until it becomes Active.
IMPORTANT: It is strongly recommended to leave all missions active, especially when working with the operations planner. Set mission as inactive only for draft missions or manually controlled missions.
Mission phases
A mission phase is a new concept introduced with the operations planner and is not related to the existing mission status:

“On Hold”:
The mission has not yet started, the units assigned to the mission won’t execute the mission.
“Satisfied”:
The mission is considered to have achieved enough of its objective for assigned units to consider other missions, but a satisfied mission does not necessarily end. This tag is used for mission triggers and for multi-mission priority.
“Running”:
A running mission will have its assigned mission to execute the mission.
“H-Hour”:
In Command, H-Hour designates the date and time at which the mission designated as the initial mission for H-Hour is to start. H-Hour in Command isn’t strictly an H-hour according military terminology as it can be customized without restriction.
“L-Hour”:
In Command, L-Hour designates the date and time at which the mission designated as the initial mission for L-Hour is to start. L-Hour in Command isn’t strictly an L-hour according military terminology as it can be customized without restriction.
Understanding the concept of dynamic (aka. multi-missioned) units
The operations planner provides the capability for a single unit to be assigned to multiple missions. Of course, the unit can only execute one mission at a time, but you can now prioritize which mission it should execute. Mission priority is set via the operations planner.
Let’s assume we have a scenario where a group of aircrafts is assigned to a patrol mission. These aircrafts should patrol an area from a given time and then start a strike mission against a group of tanks. Without the operations planner, the player would need to track the time and then manually switch each aircraft to a new mission, at the right moment. Thanks to the operations planner such behavior can be automated, and in a more complex environment, our units could even behave like a reactive AI, aware of the simulation at the strategic level.
IMPORTANT ! A unit without “Dynamic” Checked will be ignored by the operations planner dynamic assignment, if you want a unit to work with the operations planner’s feature you MUST designate it as a dynamic unit.


Notice that since we have toggle “Showing Multi-Mission” we are now allowed to assign multiple mission to a unit, they are still shown in the “Available units” list despite having an assigned mission.
This panel on the right side of the mission editor shows all missions assigned to this unit. The mission in green in the one currently executed by the unit. Missions don’t have an order of execution, but a priority, which is set in the operations planner, as we will see later.
The “Dynamic” checkbox allows the unit to be assigned to multiple missions, units are all unchecked by default to reflect default command behavior.
Below the mission list we can see the current status and phase of the mission. We will see later in the operations planner chapter as “Phase” is a new way of managing the mission dynamically and is closely related to multi-mission:

It is on this screen that you decide to add the unit to all of the missions you want it assigned to. At this point you don’t have worry about priority or to select a current mission as the operations planner will manage this for you.
In above’s example we see that Rafale B is assigned to both the “Air Superiority Patrol” and “Light Tanks Destruction” missions, and the active mission for this unit is the one in green: “Air Superiority Patrol.” Depending on the configuration of the operation planer, this unit may automatically switch to the “Light Tanks Destruction” mission at some point in the future.
Don’t worry if the multi-mission mechanism is not entirely clear to you yet, as the mission editor is only half the story. The next chapter on operations planner will explain the other half.
Interlude: “Mobile facility” vs “Ground unit” and Split / Merge ground units
One of the most significant capabilities brought by the operations planner, is the possibility to have units dynamically change mission. But not all types of units are eligible for this kind of behavior. As part of that, It is important to understand the core difference between:
- Ground units as facility which is a legacy implementation where ground units are represented as a moving, multi-aimpoint “facility” (see this old post explaining this concept).
- Mobile ground units, a new implementation, which works like others active units such as aircraft, ships etc.
The first hold a group of units abstractly represented as “mounts”, while the last is a fully simulated individual unit. The core difference that interests us here is that ground units as facility are transported as cargo which doesn’t have an existence in the simulation until it has landed (and spawned).
This means that we can’t assign or queue them a mission until they have landed, and you will not be able to achieve a fully autonomous behavior for your units, in this case.
Cargo operations are now enabled for active units, meaning that all these limitations are now removed. However, you must have the right methodology to achieve this.
Unless you have to achieve backward compatibility or if a database entry is missing, you MUST use ground units, NOT mobiles facilities, to use the operations planner at its fullest.
On the new cargo edition form, note the “type”, at the moment, the database has more content for mobile facilities:

Ability to Split/Merge ground units (facilities)
Legacy ground units associated as “facilities” can now be rearranged through this new tool.
Select an eligible unit, such as a landed detachment, right click on it to bring the context menu and click on “Split unit”:

This brings you this menu, with the details of the detachment:

You can also break the detachment into individual units with a single click:

Two eligible units can be merged together:

The Operations Planner
The operations planner adds a new level of interaction between missions and allows units to be dynamically reassigned from one mission to another.
Since the operations planner is sometimes tied to a landing plan, we have here the concepts of H-Hour and L-Hour to indicate overall operational time. These can of course be ignored, or used in a different purpose:

On the top left, one can define the H-Hour and the L-Hour values.
The H-Hour box on the left is where we can define the date and time to start the H-Hour mission. The H-Hour mission is the initial mission in the operation. L-Hour box works identically to H-Hour but they are independent.
Once an H-Hour or L-Hour is hit the respective initial mission can no longer be changed.
The checkbox in the middle ties the H-Hour to the L-Hour, meaning that the time separation will be constant between H-Hour and L-Hour when you modify the time for either.

The spreadsheet in the center lists all the side’s missions. Most columns are informational. Generally, you will be dealing with 2 columns: Priority and Phase.
Mission priority
The priority of a mission does NOT designate his supposed position in a mission execution queue. It indicates to its assigned units how important this mission is at this moment. The mission priority is used by units assigned to multiple missions to decide which mission to execute at any given time.
A unit having a mission in “On Hold” phase will not have this mission evaluated for the active mission evaluation.
Mission phases
A mission phase is a new concept introduced with the operations planner extension, it is not related to the mission status and should not be mistaken with it:

Waiting for trigger: The mission may (or may not) have already started yet but queued units won’t evaluate this mission when choosing one to be assigned to.
Satisfied: The mission is considered to have achieved enough of its objective for its current assigned dynamic units to consider other missions, but a satisfied mission does not mean its ending. This tag is used for mission triggers and for multi-mission priority.
Triggered : A running mission will become a valid candidate for multi-mission units assigned to it. Therefore, a queued unit to this mission may become assigned to it.
A unit assigned to multiple missions will pick the most appropriate mission to be assigned to, based on the priority and the phase of the mission. unless it is already active on a mission that is in “running” phase, or if all assigned missions are in “On Hold” phase.
A unit that is active in a mission in “Satisfied” phase will still evaluate the satisfied mission and may continue that mission if no other missions are available.
Name
Just like for operation, the mission’s name helps for organization. However user’s made Lua sripts might reference a mission by its name and it is recommended to be careful when changing mission’s name in such situation.
Description
This is purely an informational tag and does not affect the simulation at the moment. Use and edit this field to organize yourself.
Generated mission will usually contain some generated information
Type
This is the mission sub type as defined in Command’s simulation.
Execution Time
The time, relative to H-Hour at which the mission is estimated to begin. See the chapter “Working with estimation” for more details.
Bulk actions
Bulk action tools are located on the bottom of the operations planner. These are used to select multiple mission at once and perform simultaneous modifications on them:
![]()
Filter
The filter tool is used to do a specific term research on mission and filter the result of this search query:
![]()
Triggers
This chapter is the core of the operations planner capabilities. It allows relationships between mission and a dynamic approach when executing missions.
A trigger is like a set of a condition and an action, if the condition is met, then we do an action.
Command evaluates all these triggers every second.
For mission, there are 2 types of actions:
- We start a mission (we set the mission’s phase as “Running”).
- We finish a mission (we set the mission’s phase as “Satisfied”).
It is important to understand that Command doesn’t have a concept of mission completion, when tagging a mission as satisfied, command only indicates that the mission have enough fulfilled its objective to allow its assigned units to evaluate other mission assignment options. Of course all relevant missions have already implicit mission completion mechanisms, a cargo mission will stop operation once the task is done, a strike mission won’t launch again to strike a nonexistent targets , etc…
These 2 actions are tied to a set of conditions.
Starting a mission with triggers
Select any of the mission and look on the right side of the operations planner window. Notice the main block called “Triggers to Start Mission”, and how it is separated into 3 smaller blocks:

These smaller blocks are individual conditions. Checking them means this specific condition will be evaluated.
The dropdown on the right of each smaller block is called a conditional operator.
As you can see there are 3 types of triggers that can start a missions:
- A time based trigger
- A mission dependency trigger
- A Lua script trigger
Time-based trigger

This will be triggered when the scenario date reaches the defined H-Hour plus or minus a given duration.
Example #1 : This trigger will be true if we reach H+ 2 hours

Example #2 : This trigger will be true if we reach H- 23 hours

Mission dependency trigger
This will be triggered if all missions in “missions to check” are in “Satisfied” phase.
In this example, it will be triggered when “Air Superiority Patrol” mission is in “Satisfied” Phase:

Lua script trigger
This will be triggered if the Lua script contained returns TRUE as a value:

“Finishing” a mission with triggers
 It was mentioned earlier that Command does not have an explicit concept of finished mission.
The triggers to tag a mission as “satisfied” work just like the one to start it.
The first trigger is a time based one, it tracks the elapsed time since the mission’s phase has been set to “Running” and will be true once the defined time elapsed.
The second one is a Lua script trigger and work identically to the one in the mission start trigger – it returns the Boolean value of the contained lua script.
Logical Operators
 Triggers, in Command, can be tied with logical operators.
Take a look at the picture on the right, representing a set of triggers to start a mission:
We have set all 3 triggers to be checked. On the right of each triggers you can notice a dropdown when you can selected either the OR or AND operator.
For the triggers to return TRUE and therefore start the mission (set its phase to “Running”) each checked trigger is evaluated.
We see in this example that the first trigger has “OR” operator, the second “AND,” the third “OR.”
What it means in this situation is that the second trigger (the one with “AND”) must be true.

In addition the “AND” trigger needing to be true, either of the first or third “OR” triggers must also be true.
If all conditions are met and the current mission’s phases is “On Hold” then the mission will change it phase to “Running”.
Another example (left):
All triggers are checked (and will be evaluated), and each of them have the “AND” operator.
This means that the missions will start when all conditions are true.
Operations planner and Lua Scripting
Command has already a powerful Lua scripting framework. The operations planner allows the integration of your script as a trigger.
Clicking on “Edit Script” in either the “Triggers to Start Mission” or the “Triggers to Tag Mission as Satisfied” group will bring you to an interface where you can add your script in:

Just like the rest of the triggers, the Lua Script trigger will be executed each second for its associated mission. The Lua script must return a Boolean.
Working with estimation
Command is such a complex simulation that giving an accurate estimation of an operation duration could take up to hours of computation. The operations planner provides an instantaneous estimation at the price of reliability.
The operations planner estimation takes into account all the time based triggers and mission dependencies, it simulates a run and then display the estimated execution tie for each mission.
This estimation work only thanks to the user’s input on triggers.
The special case of Lua script
You may have noticed that not all triggers are time-based, some depends on lua script and cannot be reliably predicted. In this case, you will have to manually input a value into the trigger in this trigger, shown on the right.
It is not necessary to check (enable) the trigger, having an unchecked “Time Elapsed” trigger with a value basically tells the operations planner : “Only use this trigger when estimating execution time”. In this example, we assume the mission will be satisfied after 1 hour:

If everything is properly configured, clicking on the “Simulate” button will calculate the execution time, relative to H-Hour for each mission:

Countdown to War Planner: General Improvements and User Interface
 Command’s “War Planner” update (aka “Tiny”) is set to release in less than a month. Are you ready for Command’s biggest update yet?
In this multi-part series we take a look at the various key features introduced in this massive, FREE upgrade to Command.
Following the Overview, today it is the turn of general improvements and new UI features.
In this series:
- Overview
- General Improvements and User Interface
- The Operations Planner and multi-missioned units
- The Multi-Domain Strike Planner
- Cargo 2.0 – The Logistician’s Nirvana
- Simulation Additions & Improvements
General speed improvements: A lot of individually small speed improvements both in the map/UI as well as the simulation engine combine together to provide an improved gameplay experience – as well as improved analysis throughout in the professional edition.
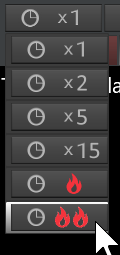
New “Double Flame” time acceleration mode: Command until now has been using two distinct time-slice settings for simulation fidelity: 0.1-sec (aka. “Finegrained mode”) and 1-sec (aka “Coarse mode”). Some of our users have asked for an additional “very coarse” 5-sec timeslice in order to achieve even greater simulation speed.
We were reluctant to step into this rabbit hole for some time, as once you start cranking up the timeslice length weird things start to happen (easy and classic example: weapon is at time-X in front of the target, at X+5 sec beyond the target, and no impact check can be easily made). However, we came up with a reasonable solution to this conundrum: automatically “throttle back” the timeslice setting to 1-sec whenever something that requires this precision happens or is about to happen, and freely let loose the speed demons in any other case. This has been tested extensively with very satisfying results, both in terms of simulation stability/integrity as well as the chief driver, performance. (Anecdotally, one of the early adopters used this feature to turn a nine-hour analysis into a three-minute run instead. Obviously, the performance benefits can vary wildly according to the scenario and use-case.)
And why is it called “Double Flame”, you may ask? This is why:
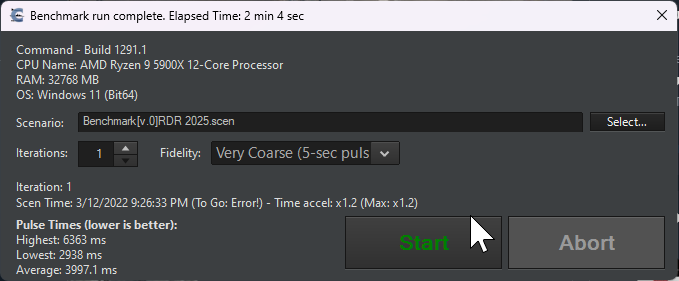
New feature: Benchmark mode: This provides an objective way to measure & compare a system’s performance and suitability for CPE, by repeatedly running any selected scenario in headless mode (similar to Monte-Carlo execution, but without any analysis results). By default, the execution is run using fine-grained pulse mode (ie. 0.1-sec pulses) in order to stress-test the simulation engine and the hardware resources; however, “coarse” and “very coarse” options are also available.
 Some notes on this:
– The benchmark mode indicates the performance only for the simulation engine, not for the map/UI engine. For this reason, the rest of the UI (main window and map etc.) is hidden away while the benchmark window is active.
– It is best to run scenarios that can be run AI-vs-AI (e.g. “Duelists”, “The Tiger and the Dragon” etc.), otherwise one of the sides is going to remain idle during execution.
– Total scenario running time is not shown, because it can be an unreliable performance metric (e.g. did the scenario end quickly because it was run fast, or because an “end scenario” trigger was fired?).
Hypersonic glide vehicles (HGV) and directional-EMP (D-EMP) weapons: Previously available only in the Professional Edition, these two weapons types are now also available in the commercial edition.
- Directional EMPs: CMANO v1.12 introduced omnidirectional tactical-EMP weapons. CMO now expands on this feature by also simulating directed-EMP warheads such as the one fitted on the USAF’s experimental CHAMP project. Using weapons with directional-EMP warheads is simple: Allocate the weapon at the desired primary target, and the weapon will first reach this target, “zap” it with its EMP payload, then head to the next nearest target, zap that one, then head to the next nearest target etc. until it runs out of fuel (or is shot down). This mode of operation makes D-EMP weapons very useful against clusters of closely-grouped targets with sensitive electronics, as is commonly the case for EW/GCI radars, C4 nodes, SAM batteries etc. The DB3000 currently has one directional-EMP weapon: Weapon #3407 – AGM-158B JASSM-ER [D-EMP], a variant of the common AGM-158B tactical cruise missile. By default, it is available for loadout #25091 (24x AGM-158B D-EMP), carried by: Aircraft #4325 – B-1B Lancer – USAF, 2018, IBS. Of course, weapon records holding this weapon can also be shoehorned into any aircraft loadout using ScenEdit, as normal.
- HGVs: Hypersonic Glide Vehicles (HGVs) are boosted into near-space by rockets, then dive back into the atmosphere and glide towards their (usually distant) targets, optionally using a complex trajectory with pre-specified waypoints to complicate detection and interception. As many HGVs are still “developmental” systems with many aspects of the behavior of deployed systems (such as Avangard) are still subject to classification rules, Command’s implementation relies mostly on currently publicly available data, partially from the tests of experimental hypersonic vehicles like the HTV-2. Command’s current implementation assumes a sharp dive into the atmosphere after release from the parent booster, followed by a pull-up maneuver that establishes the HGV to a shallow glide trajectory towards its target. (In the database, the “Cruise altitude” value is used to mark the altitude at which the pull-up maneuver will start). This is an example of the trajectory shortly after atmospheric pull-up, as displayed on Tacview:
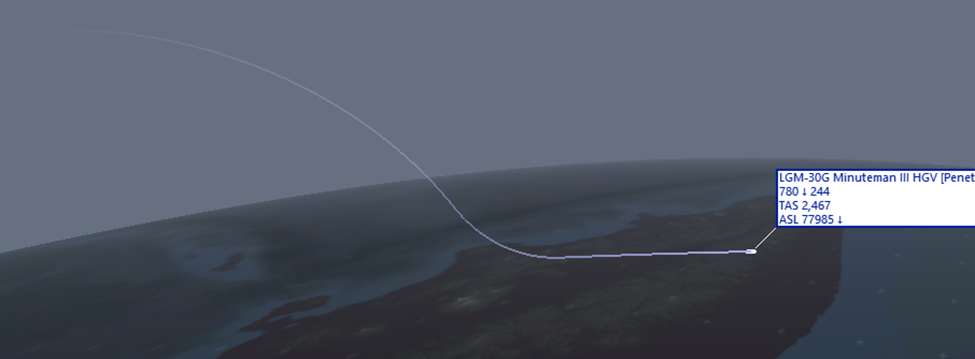 Players can optionally also plot a waypoint trajectory, in the same way as they can plot a complex course for cruise missiles.
Separated autosave for each scenario: The “Resume from autosave” function now fetches from the new Autosaves folder the latest modified root scenario folder that contains the specific autosaves, and then uses the autosave.scen of this folder. If you want to load an autosave from a specific scenario, you can select a scenario in the “load scenario” window and a “load autosave” button will appear if a valid autosave exists. This ability can be very useful if you need to keep save copies from multiple different scenarios you may be playing.
Formation presets: You can now quickly arrange the members of a group using any of a range of formation presets:
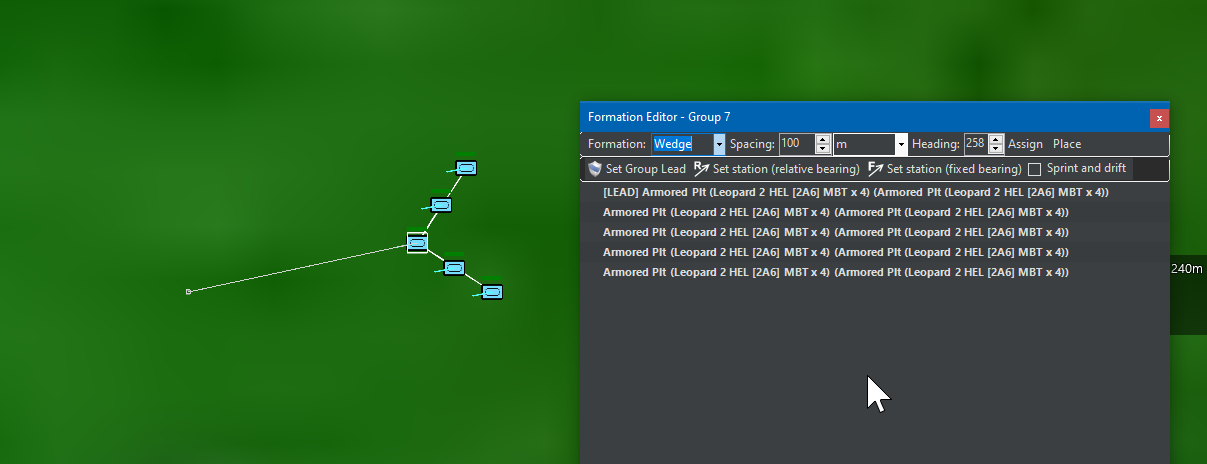
The presets work with any unit type and allow quickly positioning units relative to each other and to the group’s lead. There are various controls on a new toolbar within the formation editor:
- The “Formation” selector allows picking from a number of different presets. These are defined in the file \Resources\Formation\StandardFormations.txt, which also documents the format so that you can add your own variants if needed.
- The “Spacing” value sets the spacing between each unit, either in nautical miles or in meters.
- The “Heading” value sets the assumed heading when ordering the formation position.
- The “Assign” button arranges the formation stations based on the previous settings; all group members will do their best to get themselves into these positions ASAP (they may not be physically be able to, for example when a surface group transits a narrow strait; in this case they will converge towards the group lead).
- The “Place” button is visible only in ScenEdit mode, and instantly teleports the group members to their assigned stations (useful for quickly arranging a group without the real-world delay, e.g. when constructing the initial setup of a scenario).
Improved Mission Editor layout: This can sound minor initially, but the feedback we have received indicates a massive quality-of-life upgrade. The ME window has been significantly revamped, with the sections for assigning/unassigning units, configuring mission settings and selecting strike targets now all relegated to separate tabbed windows. This opens up the previously cramped space of the ME window and allows much more “real estate” on each of those sections, both making usage easier and also providing more room for future additions:
Mission Editor – Generate flight plan for assigned aircraft: One of the new features added to the ME is the ability to generate a flight plan for any air mission before the assigned aircraft take off. This can be used either in close integration with the Multi-domain Strike Planner (more on that on a next post) or as a stand-alone feature.

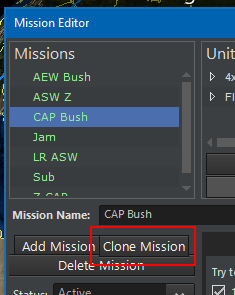
Mission Editor – Clone existing mission: Another “small but mighty” quality-of-life improvement: Copy an existing mission’s settings to a new one. If you need to create a lot of similar missions quickly and don’t want to use scripting for any reason, this can be a significant time-saver:
New bathymetry layer: CMO’s original “Relief” layer was very warmly received, and a persistent request has been to provide a similarly rich visual layer for the bathymetry data. Such a layer was indeed made available, initially for the release of CPE 2.0 in 2021, and now we are glad to make it available in the commercial version:
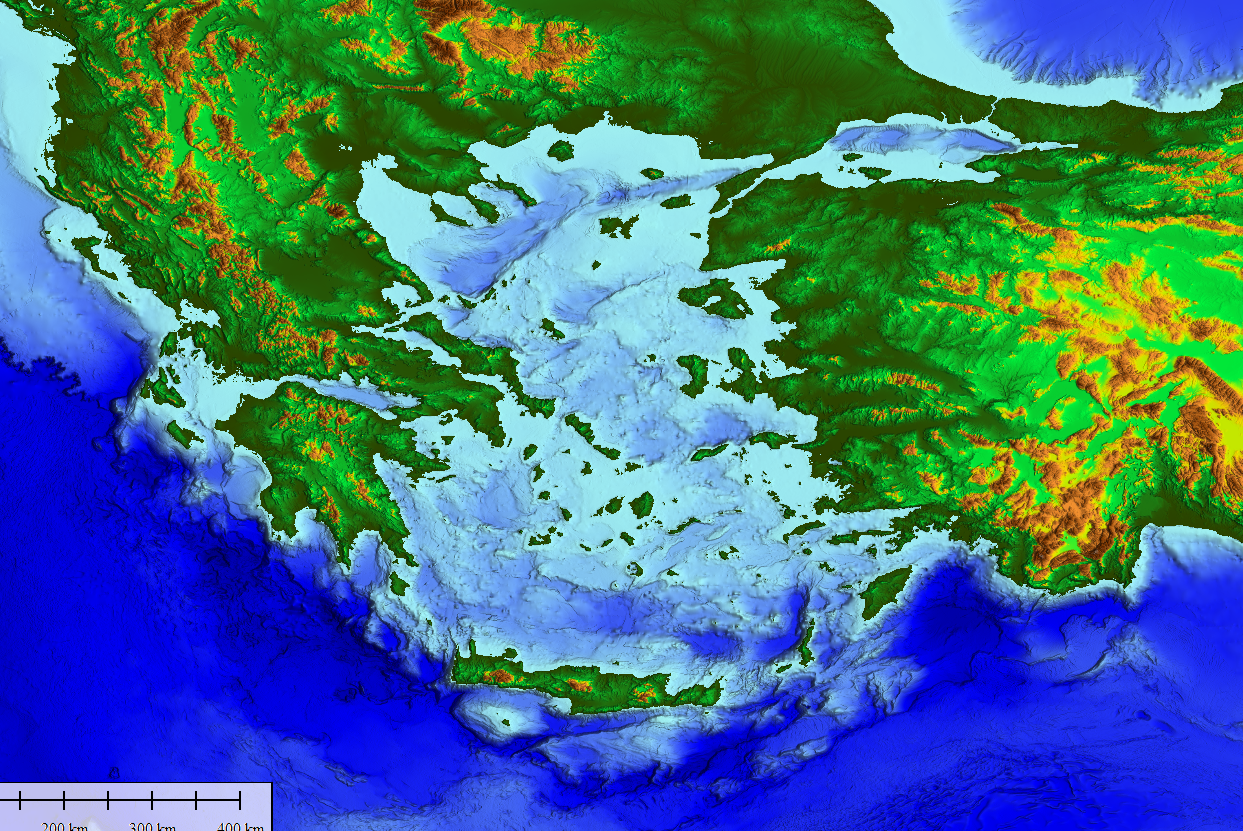
This layer can be very useful for all aspects of underwater operations, from submarine & ASW ops, to mine and counter-mine systems and tactics, UUV control etc.
Load/save doctrine XML templates: One more popular request is now realized: Players have long asked for the ability to customize a ruleset for Doctrine & ROE settings (including EMCON, WRA etc.) and then be able to apply that as a template to other units, groups, missions etc. This is now possible, by the ability to save and reload such templates. In addition, because the save file is in raw XML format, the contents of the template can be freely edited – by hand, or by automated XML-parsing tools or scripts. Obviously this opens up a variety of automation capabilities.
Expanded WRA range options: The introduction of realistic boost-coast kinematics for AAW missiles, and the accompanying changes to default aircraft missile evasion behaviors (more on both of these on a forthcoming post) has made players more interested in more WRA range options. So in addition to the existing absolute-number figures, percentages of nominal range are now also available (25%, 50% and 75% of nominal). Furthermore, given that the new missile kinematics now reward evasion behaviors favoring outrunning the missile rather than trying to beam/notch it, a no-escape zone (NEZ) range option has been added to WRAs for AAW targets: 
The logic of NEZ is actually pretty simple: If the target turns instantly at the moment of weapon launch and runs away from the firing unit, will the weapon be able to run it down? (If the target has been class-identified, its maximum possible speed at its current altitude is used as the reference “runaway” speed; if not, its current observed speed is used instead).
The benefit of using NEZ for a missile shot is that it makes it highly unlikely that the target will able to outrun the shot. On the other hand, against a high-performance target this leads to a severe reduction in practical launch range: Make your shot too conservative (to deny the adversary a chance to outrun your weapon), and you may possibly surrender the engagement initiative to the enemy. Again, a matter of trade-offs and risk management.
Revised message log: You generally liked CMO’s existing message log for its versatility and power, but you were not terribly fond of its “grouping by type” of messages. You told us you prefer a single waterfall-like flow of messages (ironically, much like CMANO’s original one) but with the option to dynamically show/hide messages by type. So this is what we came up with:
- Messages can now be filtered by type directly by clicking on each of the type descriptions in the olive-green buttons (when a type is disabled, its corresponding button color changes to red).
- Clicking on the “All” button instantly enables/disables all types.
- Clicking on the “>Raw” button toggles between “raw” (aka “waterfall”) and interactive modes.
- Clicking on the red-circled icon will detach the message log to its own window, and clicking it again will re-dock it.
New logged-message category: Doctrine/ROE changes.Like all other message types, this can be configured to appear on the message log, raise a pop-up and optionally stop the clock, show a message balloon etc.
Area & reference-points manager: Another migrant from Command-PE, this very handy tool will be your new best friend if you use areas and zones a lot (and in non-trivial scenarios we’ll assume you do):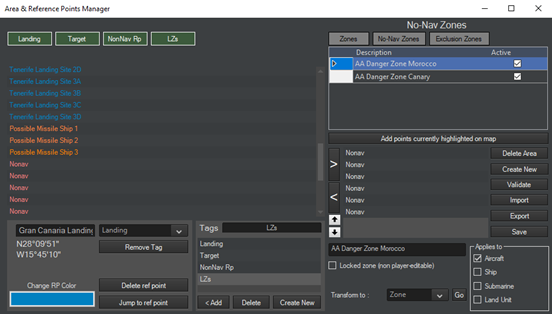
This offers a centralized interface for editing reference points on large-scale scenarios. Ref-points and zones can be organized by tagging and visually distinguished by different colors. This can be superbly helpful, for example, for setting apart different patrol areas or exclusion zones.
Graphical Display of Satellite Pass Prediction: The “Satellite Pass Prediction” window now has an extra tab, which displays the same information in a more visual manner: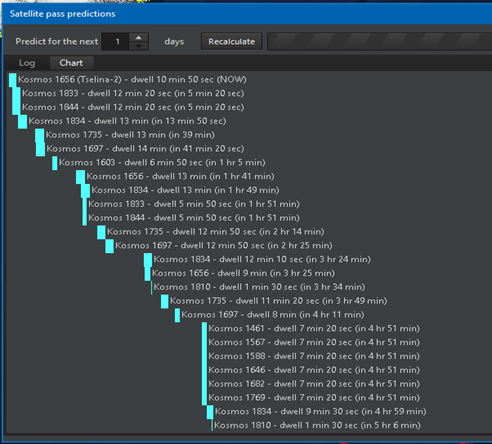
The tabular “spreadsheet” display or orbital passes still remains available, and is still a very powerful way of obtaining the info you need (e.g. sorting by any information field), but this graphical way provides an at-a-glance ability to quickly compare satellite availability windows.
Quick manual weapon allocation: Don’t trust the AI to make the optimum weapon allocation (or you’re the kind of micromanagement freak that never appears in grognard circles), but the full manual weapon allocation window intimidates you with its myriad combinations of shooters, targets and weapons? There is now another way:

Yes, it’s nothing Earth-shattering and if you’re a longtimer of the genre you’ve already seen this on other games. Still, you apparently like it well enough that you consistently asked for it in Command too, and we are happy to oblige.
Notice, too, the new “Investigate” and “Drop Target” commands. “Investigate” is another popular long-time request; the unit(s) will intercept and “shadow” the contact of interest but not engage unless in self-defense. Some additional new commands not shown in this screenshot:
- Refuel To Tanker
- Join Group As Escort
- RTB
- Assign New Home Base
Plot a course for the selected unit directly by right-clicking anywhere on the map: This is a boon to players coming from RTS games, where right-clicking to direct units is as instinctive as breathing. As in RTS titles, you can also plot multiple waypoints in succession by holding the shift key. During testing this was found to be annoying for some players who prefer the good old F3 way, so this behavior can be enabled/disabled through the game options window.
New optional UI/Map element: Barks: Barks are short text notifications that can be set to appear, briefly, anywhere on the map. Some examples:


The appearance and “styling” of the barks (color, text, duration etc.) is fully customizable through the Lua API, so you have full power to add them on any action performed. We can only begin to imagine what some of the more resourceful modders in the community will do with this feature.
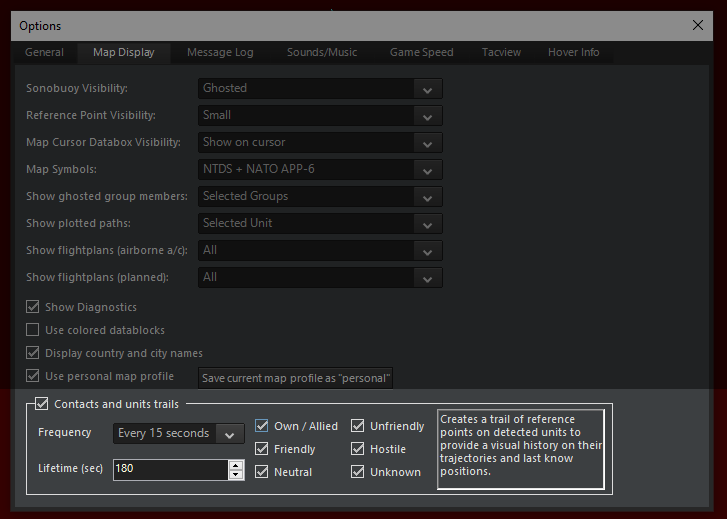
New optional UI/Map feature: Slug trails: This something you may already be familiar with, if you have past experience with air-traffic control radar screens, sonar tactical consoles etc:


Slug trails can be configured through the Game Options window:
Flexible usage of CPU threads on LOS Tool: When we introduced the Line-Of-Sight (LOS) tool in CMO, some players whiplashed from “Meh, CMO does not utilize my multi-core CPU as much as I expected it to” to “HELP!!! When The LOS Tool is active, the rest of the game slows to a crawl!” (Don’t say we didn’t warn you…)
With this in mind, we added the ability to configure how many of the CPU’s available hardware threads (ie. virtual cores) can be allocated for use by the LOS Tool, therefore leaving the other cores/threads available to the UI and simulation engine:

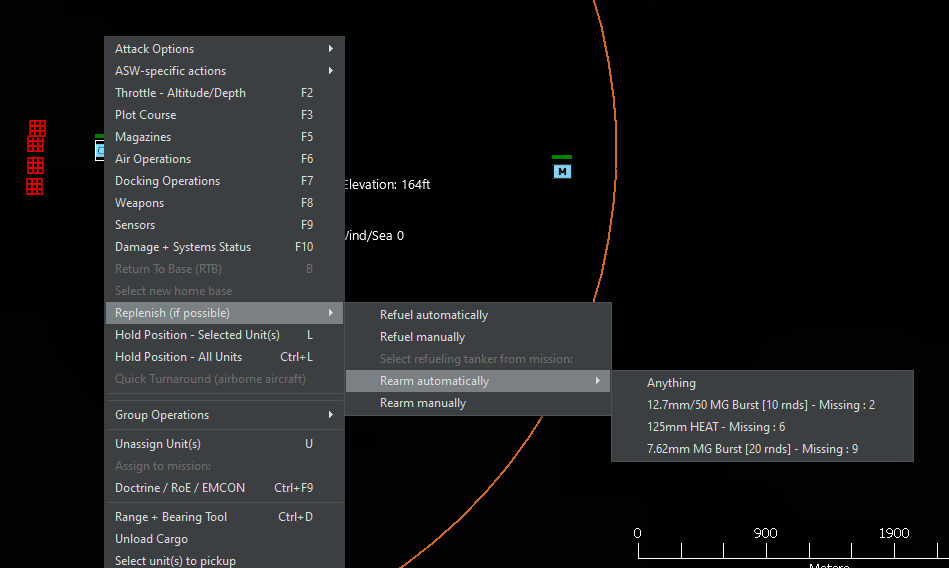
Improvements on replenishment menus: The “Replenish” context menu now displays which type to rearm and will find automatically the eligible supply platform with this weapon in store. The context menu only shows the relevant weapons that have missing ammo, so it is easier to replenish a unit from various wide-spread supply facilities/vehicles/ships and keep track of what is missing. Example:
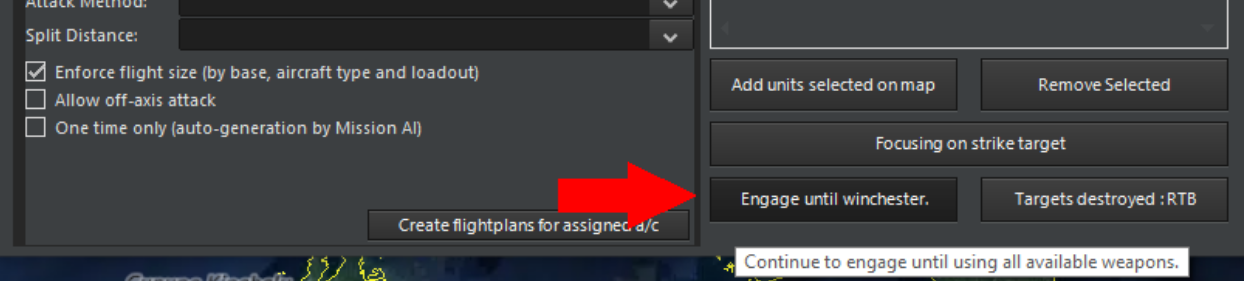
Ability to toggle more involved attacks (stick until winchester) in strike missions (toggle in strike mission UI):
Configurable sim-pause behavior: You can now configure whether opening up certain windows such as the DB viewer or Air-Ops will implicitly pause the simulation execution or not:
Include direct-path area in CZ rendering: When looking at a submarine’s sensor coverage of its CZ rings (if applicable), it can be easy to lose sight of the inner direct-path area where sonar detections are most feasible. This has now been rectified:

Note that this range represents the surface-level detection ability (detection range against under-layer targets, for example, will likely be lower) and dynamically adjusts to weather & environment conditions (boosted by surface ducting if present, shrunk by bad weather if present etc.)
Minimap improvements: The different minimaps have been improved in their presentation and unit rendering, and they also now include land-cover type in their color. Example: 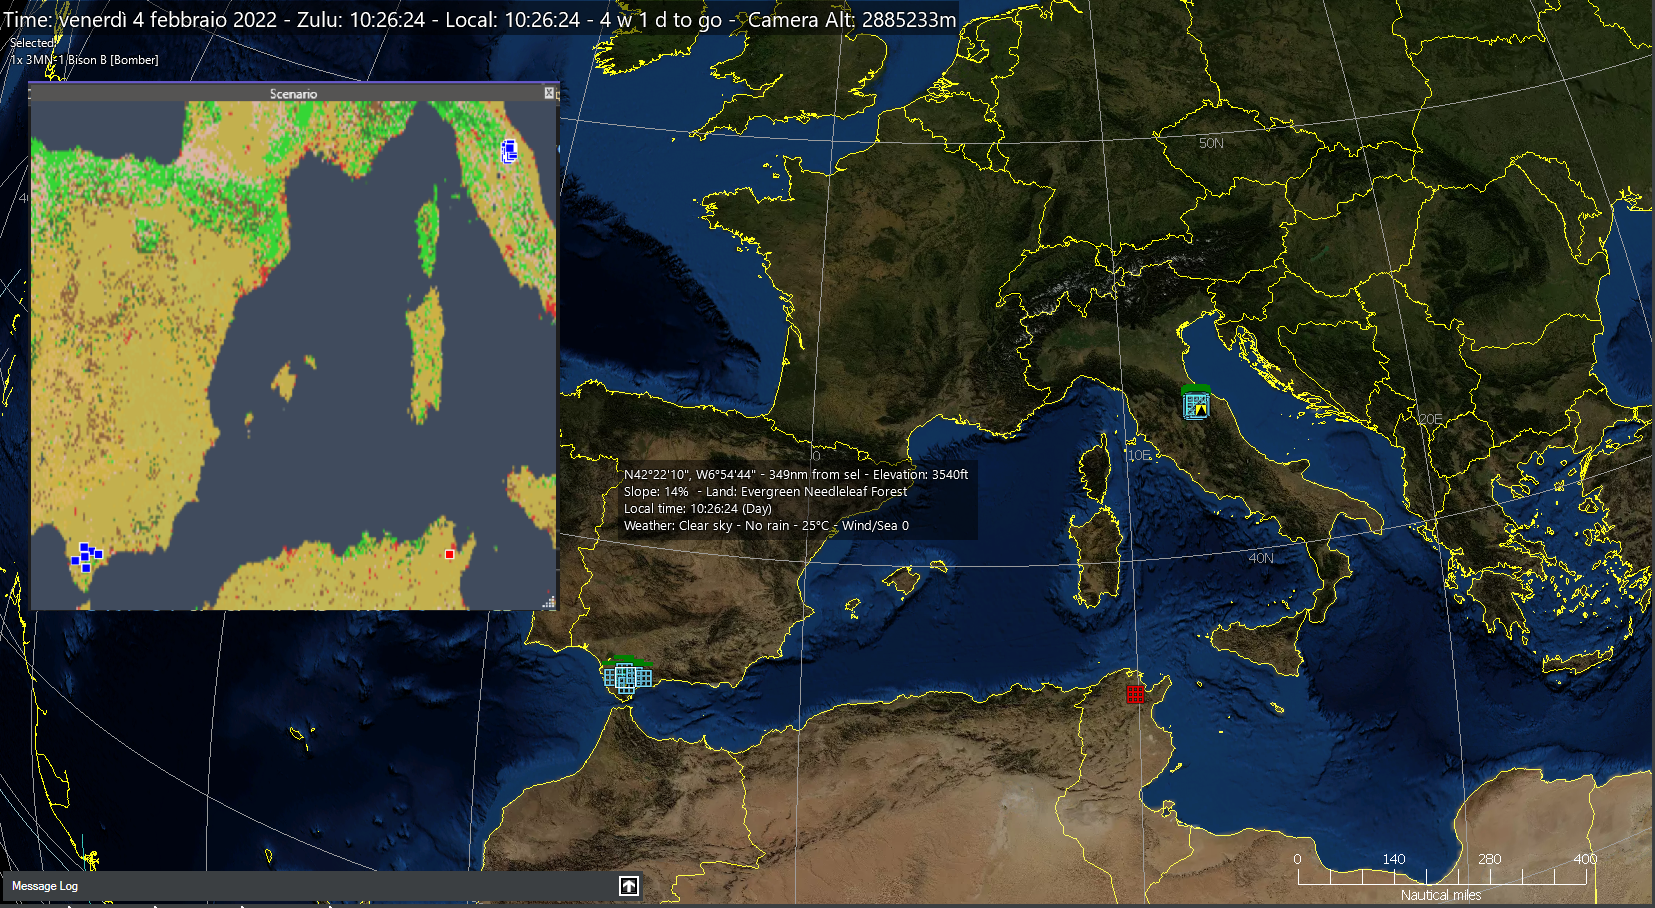
Countdown to War Planner: Overview
 It’s finally coming!
After nearly a year of frantic, tireless development, and an extensive public beta, we are excited to announce the imminent public release of the biggest update in Command’s history (yes, even exceeding the gargantuan changes of the CMANO-to-CMO transition): The War Planner update.
Known tongue-in-cheek to beta testers and early adopters as the “Tiny” release (as it has been anything but), the War Planner update brings dozens of super-major feature additions (including some features previously restricted to Professional Edition), hundreds of simulation improvements, and myriads of tweaks and bug fixes to rival even the launch of Command: Modern Operations in sheer scale. It has been named as such, because many of the changes and new features are oriented towards giving players an unprecedented power and flexibility in organizing and automating complex operations that previously required a lot of manual work and tedious coordination. Waging elaborate, theater-wide multi-domain operations has never been easier.
And the best part? It’s all completely free.
To get a taste of what’s to come, following is a highly-compressed summary of the major features of this colossal update. These will be elaborated in much greater detail in forthcoming articles.
In this series:
- Overview
- General Improvements and User Interface
- The Operations Planner and multi-missioned units
- The Multi-Domain Strike Planner
- Cargo 2.0 – The Logistician’s Nirvana
- Simulation Additions & Improvements
Operations Planner: Ever wished you had an ATO-like overview of all missions and operations planned or currently executing, their status and hierarchical priorities and dependencies? With units or even entire task forces automatically switching from one mission to the next as objectives are achieved? Wish no more. The brand-new Operations Planner makes this, and much more, a reality.
Multi-Domain Strike Planner: Throw away your planning spreadsheets! You asked/begged/hostaged family members for it, and now it’s here. Coordinate massive, complex strike missions with time-on-target, complex flight plans (incl. in-flight refueling) , multiple attack patterns and multi-domain strike combinations. “Bringing everything together on a strike is just too complex/difficult” is officially over as an excuse. If you don’t master this, your adversary most definitely will.
Cargo 2.0: The sub-header for this feature is often “The Logistician’s Nirvana” – and that should be your first hint. Transfer both combat units and also weapons, stores, fuel and any arbitrary material. Place your cargo on a multitude of different container types, from standard ISO-blocks to specialized boxes, each with its own peculiarities. Transload cargo at airbases, ports, railyards etc. in order to haul it over even transcontinental distances. Automate all this through cargo and (NEW!) transfer missions. Set up complex logistical chains from mainland factories all the way to the front line. Conquerors from Napoleon to Alexander would have given their right arm for such a tool – and you get it for free. Who ever said life is fair?
Area & Reference Point Manager: Areas, zones, ref-points and overlapping fields oh my! A centralized way to manage anything and everything related to reference points.
Custom Environment Zones: Multiple & moving weather fronts? Check. Bend the laws of physics on a localized area? Can do. Specify carefully hand-picked weather, terrain and other environmental properties in order to test or compare sensors and other environment-dependent components? Yup. Unleash your inner nature wizard with this puppy.
Air combat mechanics overhaul: Boost-coast AAW missiles (ie. the vast majority of them) now correctly accelerate to their maximum speed by their boosters and subsequently coast over the rest of their flight, trading altitude for speed (and vice versa) while also shedding speed due to drag – especially on sharp maneuvers. This makes them much easier to avoid at the edge of their envelope, where their energy reserves are depleted. Missiles with specialized long-burn motors have a decisive terminal-energy advantage over plain boost-coast systems. Virtual pilots are aware of these new dynamics and will exploit them to “drag out” incoming missiles, with beaming/notching as a last resort. To counter these counters, new additional WRA firing-range settings (including “No-Escape Zone”) are available. A2A and S2A missile engagements are, as a result, both more dynamic and far more realistic now.
“Double-flame” time acceleration: “I wish my simulation runs had executed more slowly, I had time to spare” – said no-one on their deathbed. Aside from an array of general sim-speed improvements, this update brings a brand-new exclusive (and optional) time accel mode: “Double Flame”. This cranks up the virtual timeslice to 5 seconds, massively speeding up simulation execution. “Hold on”, we hear you say, “bad things start to happen when you get so coarse in your timeslice”. You bet they do. So how did we solve it? Find out in one of our follow-ups.
HGVs and D-EMPs now available: Yes Dorothy, the previously available only in CPE hypersonic glide vehicles and directional-EMP weapon types are now available in the commercial version too. Yes, they can be pretty useful if used correctly – especially in coordination with other, more abundant assets. No, they won’t save you from certain doom if the rest of your ops suck. Treat them as magic saviors at your peril.
Palletized Weapons & Stores: Yes, we know you’ve all seen AFRL’s videos on the Rapid Dragon concept. Yes, we know you drooled over the new possibilities. Newsflash: So did we. So now you can do that too. Is it awesome? You bet it is.
Passive Coherent Location System (PCLS) sensor, aka “Passive Radar”: How do you detect and track stealth aircraft? One of the possible ways is to break out of the classic monostatic radar paradigm and embrace alternative solutions like PCLS. Are they omniscient? No. Do they have operational drawbacks, some of them quite severe? Yes. In the right conditions, can they detect stealthy aircraft that conventional radars are hopeless against? Yes, yes and yes. Find out how.
Intermittent Emissions: Radars and other active emitters no longer have to strictly choose between active and silent: You can now blink, and schedule how to. No scripting necessary! (But scripting still a very powerful option). Find out how, in our follow-up article.
Revised Mission Editor: “It’s insanely better than before!” is the least positive comment we’ve heard about the revised ME layout. Now you too can experience what every beta player considers the finest visual experience since “Love Actually: The Directors Cut”.
Revised Message Log: You asked (intensely and consistently…) for a fully filterable message log, dynamically enabling/disabling messages per type, while also retaining the “responsive nature” (show location, optionally show balloon etc.) of the messages. Oh and also keeping all the existing goodies (docked or free-floating, “raw”/waterfall mode, per-type coloring, balloons etc.). Our first reaction was “So, you essentially want Visual Studio’s errors & warnings list?” Our second reaction was “Maybe this is feasible after all”. Our third reaction was to go ahead and build it. And there was much rejoicing throughout the land.
Distinct Ground Units: As much as we keep telling you Command is not SPMBT or Combat Mission, you keep asking for distinct ground vehicles. So there you go. Command now offers individual ground units, in addition to the previous method of modeling them as aimpoint-facilities. You’ll find ground units modeled with the same level of detail users expect of ships and aircraft: propulsion, fuel, mounts, sensors, etc. are all simulated, as are characteristics like armor (incl. ERA, slat armor, etc.). Ground units bring brand-new capabilities to the fight, such as amphibious vehicles capable of transitioning between land and water (with distinct speeds and fuel consumption in each domain).
Save/Load Doctrine & ROE Settings: Sorry, Cimmerian; crushing your enemies and seeing them driven before you is only the _second_ best thing in life. The first-best, is to carefully construct your Doctrine & Rules of Engagement settings for a specific side, mission, group or individual unit, and then export them to a text file where they can be freely re-imported for any other simulation object as well as edited, either by hand or in an automated fashion. With power such as this in one’s hands, no prayers to Crom are necessary.
Overhauled Reaction Times: The differences in reaction times, and their effects, are now more critical than ever. All units use common-reference “Combat System Generation” (“Cockpit Generation” for aircraft) to model the modernity of their combat systems, combined with an “Ergonomics” value to handle intra-generation differences (the atrocious switchology on early missile-age aircraft will most definitely get you killed now). Older, WW2-era ships may take up to 5 minutes to engage a target, while Aegis cruisers fire in <20 seconds. Cold War fighters will be beaten to the draw by modern, fifth-generation fighters. Overmatch, that ever-elusive dream, is now possible – but beware, it goes both ways.
IR & Visual Sensor Improvements: IRSTs and high-mag cameras are no longer near-magical counter-VLO sensors. They may still be your best bet for detection, but you won’t be volume-scanning for stealth fighters at >100nm anymore. (You can still spot/track them pretty far enough IF something/someone else first cues you there)
Radar & IR Stealth Improvements: Sensor improvements come coupled with a massive overhaul of signature modifiers in the DB, which significantly improve the realism of our stealth model by drawing clearer distinctions between shaping and RAM generations. We also added special DB “flags” to indicate the presence (or lack) of certain stealthy design features such as S-shaped intakes, exposed fan blockers, active cancellation, and stealth pylons. The overhaul also extended to IR modifiers, which now not only model whole-aircraft IRSS (distributed vs. conventional fuel tanks, low-E coatings) but also specific IRSS features such as shielded “anti-Strela” exhausts, masked exhausts, heavily masked / slit-shaped exhausts, and peak temperature reduction or “cool-air mixing”.
Formation Presets: Tailor your formation’s layout with a number of different presets (wedge, circle, echelon, line, diamond etc.) or make and store your own custom template. Customize facing and distancing to suit your preferences. Transitioning from parade to full-attack and back (perhaps in the middle of your parade?) has never been easier.
Bathymetry Layer: Visualize the terrain contours of the naval domain as clearly and as richly as you already do for the overland globe surface. A must for every facet of underwater ops, from sub/ASW hunts to mine warfare to UUV control to tracking whale migrations. Jacques Cousteau would have rightly wept.
Graphical Satellite Pass Display: The “Satellite Pass Prediction” window now offers a graphical representation of future satellite passes, sparing users the need to compare timeblocks to figure out which satellites will be overhead when. Who needs data grids when you can visually compare availability windows…. right?
Benchmark Mode: Looking to compare rigs? Command now includes a benchmark mode, which will repeatedly run any scenario you choose in “headless” mode and output performance metrics. Now your machine’s sorry state will be plain for all the world to see.
Miscellaneous UI Improvements (Weapon Quick-Allocate, Slug Trails, “Barks,” etc.): Quickly allocate weapons manually, without needing to bring up the (intimidating to some, apparently…) manual allocation window. Have units or contacts bark to each other (yes, you read that right). Make unit & contact movement paths & histories more obvious (and easier to visualize in a screenshot) by enabling “slug trails”. Plus a few more tricks we’ll see in detail on the UI-dedicated UI follow-up.
Weather effects on ship seakeeping: Sea state limits are no longer treated as hard lines. Smaller ships are now affected by progressively higher sea states, which will slow their max speed but not necessarily immobilize them. Moving from the QE to a small sloop now most definitely feels like it.
Aircraft Max Endurance: If you’ve ever used the “keep aircraft in the air indefinitely through repeated air-refuelings” cheat, first: SHAME ON YOU! Second: You won’t be able to do it anymore. Aircraft are now limited in persistence both by their onboard consumables and also crew fatigue. And you wonder why everyone loves drones.
As you can see, there is a lot here to unpack in greater detail – and we intend to just exactly that, in a series of follow-up posts dedicated to each of the major areas of improvement.
So stick around!
The scenarios of the Falklands campaign
 The release of the new “Falklands” campaign pack is getting closer.
As always, this release will be accompanied with a new CMO update with the latest database versions.
Let us take a look through the scenarios in this historical (with a sprinkle of hypotheticals) battleset that recreates the famous 1982 conflict in the South Atlantic, created by a real-life veteran of this campaign.
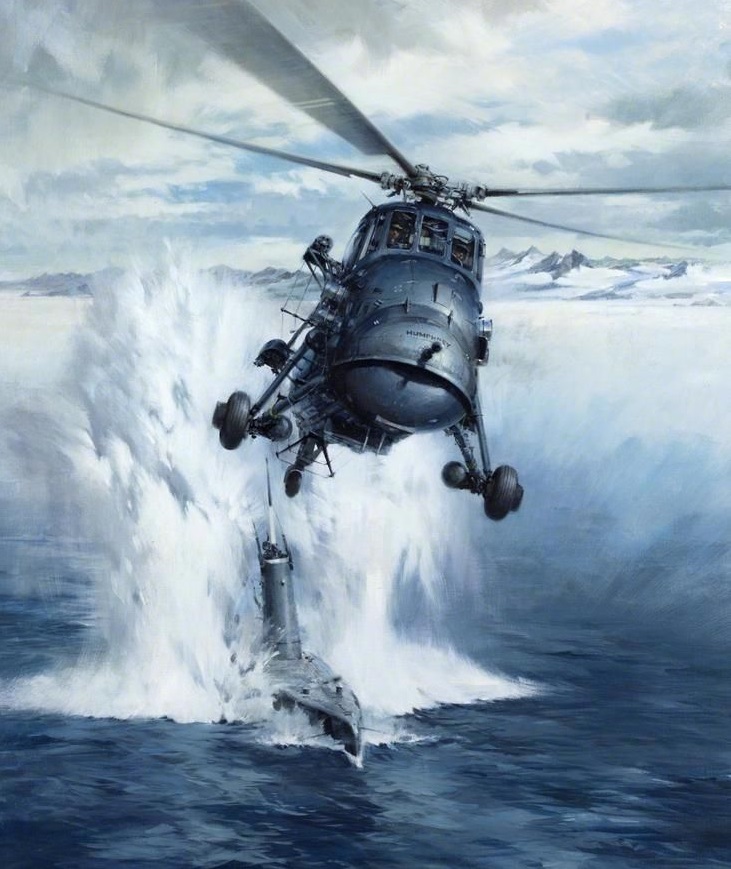 Operation Paraquet
Taking back the occupied island of South Georgia was the necessary first step in the Royal Navy’s campaign to re-take the Falklands. Accordingly, a destroyer group led by HMS Antrim was sent near the island to conduct reconnaissance operations.
On 24 April, the Antrim group was informed that an enemy submarine was operating in the vicinity. This alarming news caused the withdrawal of the group’s support vessels to the north, to safer waters.
During the early morning hours of 25 April, Antrim’s Wessex helicopter spotted a surface contact exiting from Grytviken harbor. What was the Argentinian garrison up to?
 Superfuse
Early on the morning of the 1st of May, a lone Vulcan bomber attacked Stanley airport after taking off from Ascension island and air-refueling repeatedly; this was the longest-ranged recorded bombing mission in history.
Less well-known, but arguably more important, was a series of follow-up attacks by Sea Harriers launched from the RN task group, striking Stanley airport again, with a further strike on Goose Green airfield.
Argentine forces were caught unaware by the Vulcan strike, but were now fully alert and expecting the follow up strikes by the “Shars”. After the Vulcan had wacked the bee-hive, this would be anything but a cakewalk.
This scenario has been enhanced with the “Fog of War” aspect – therefore expect the unexpected.
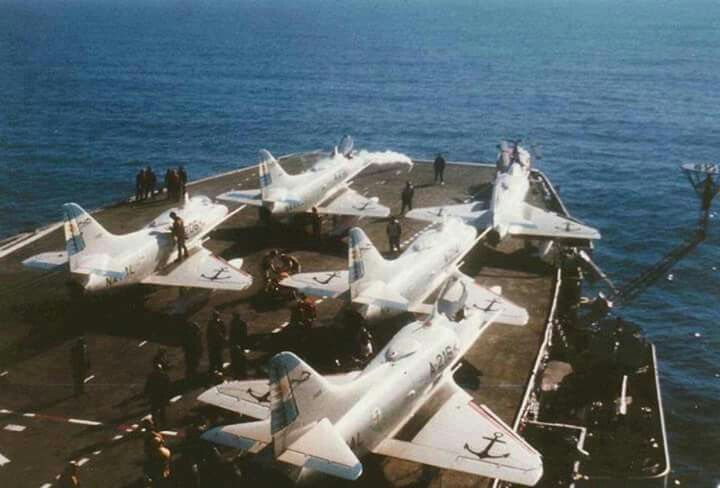 Fleet Action
On the 27th of April, the Argentine fleet sailed from its bases and headed towards the last reported location of the British naval forces. The majority of the Argentine Navy, including its aircraft carrier ARA Veinticinco de Mayo, was now at sea. Its mission: to find and engage the British task force, and either destroy it outright or inflict enough damage to force it to withdraw from the theater.
The overall Argentine plan was to conduct a three-pronged “pincer” attack on the British fleet, using the General Belgrano group as the “Southern force” (designated Task Group 79.3), the aircraft carrier group to the north-west (Task Group 79.1) and an Exocet-armed corvette group (Task Group 79.4) further north.
The northern prongs of the pincer were closest to the estimated location of the RN ships (and they also comprised of the most modern assets, with a an aircraft carrier loaded with capable attack aircraft, plus several missile-armed warships), so they would probably attack first; Belgrano’s gun-armed TG79.3 would subsequently close-in from the south and contribute to the battle once British forces had hopefully been weakened and scattered. The attack was also going to be supported by airforce land-based assets.
On the 30th of April, their intelligence indicated that the British carrier group was to the North-east of the Falkland islands. Since arriving in-theater, the British fleet had declared a 200nm Total Exclusion Zone (effectively a “stay out of here or be fired upon, no warnings” zone) around the islands. To avoid providing a political justification for the British to attack them first, all three Argentinian task groups stayed at the edge of the TEZ limit, waiting for the RN carrier group to show its hand.
They didn’t have to wait long: On the 1st of May, Argentinian-occupied airfields in the Falklands were attacked by multiple directions, first by a Vulcan bomber and subsequently by Sea Harriers from the RN task group.
The British fleet had done its part in the airfield raids, but by doing so it had revealed its rough location. Airforce attack aircraft in the Argentian mainland were primed and readied, and the Veinticinco de Mayo prepared her hosted airwing of A-4Q attack aircraft for an “alpha strike” on the British group (with the Hermes & Invincible being the priority targets), and sortied its S-2 patrol aircraft to get a final fix on the RN group before attacking. The first post-WW2 carrier battle was about to commence.
 Hunter-Killer
On the afternoon of 1 May, the Churchill-class nuclear submarine HMS Conqueror reported that she had sighted the Argentine “pincer’s” southern prong (Task Group 79.3), composed of the elderly cruiser ARA General Belgrano (ex-USS Phoenix) and her missile-armed escorts. Conqueror then shadowed the southern force throughout the night and early morning of 2 May, making frequent reports to Northwood.
Admiral Woodward was heavily concerned about this Southern force. Since arriving in theater, the British fleet had declared a 200nm Total Exclusion Zone (effectively a “stay out of here or be fired upon, no warnings” zone) around the Falklands. All the pincer elements, including TG79.3, had so far stayed just outside the TEZ, to avoid giving British forces a political excuse to pre-emptively attack them. From Woodward’s operational picture, however, it was clear that the pincer forces were about to step into the TEZ and begin converging on the British fleet, and Belgrano’s group would soon sprint north-east to contribute to the decisive Argentinian attack. Furthermore, by doing so it would quickly move through Burdwood Bank’s shallower waters, making it more difficult for Conqueror to shadow the group and remain in ready-to-attack position.
Woodward had no other assets in close proximity to use against this task group; if Conqueror lost contact with them, they might well be re-acquired too late, maybe even just as they closed upon the British ships and attacked them. Clearly this was an unacceptable prospect, and a decision had to be made.
A request for modification to the standing rules of engagement (specifically to deal with the threat of TG79.3) was quickly passed up the chain of command, and eventually put before the PM’s War Cabinet. The matter was discussed, and the decision was made to approve the attack. Conqueror was given the green light to close with and attack General Belgrano’s group – the first time a nuclear-powered submarine would draw blood.
 “Handbrake!”
Following the sinking of the General Belgrano, and the surface navy’s hurried withdrawal from the Falklands theater, Argentina’s hopes for striking the RN task force now fell to land-based air assets (plus any available submarines).
The Argentine armed forces had been severely crippled by the recent EEC embargo. This was especially so for the Argentine Navy’s Second Attack Squadron, equipped with Super Etendard. The squadron had received only five of its 14 ordered aircraft, and only five of ten of the air-launched versions of the Exocet antiship missile.
The pilots hurriedly developed a testing and training plan to prepare themselves for the arrival of the UK Task Force. They studied radar manuals for the Type 42 destroyers, developed their own tactics and exercised against the Argentine naval units (including, ironically, Type 42 destroyers recently purchased from the UK!) to test both tactics and aircraft.
P-2 Neptune MPAs were included in the training, to be used as scouts to detect the ships of the Task Force and vector the strike aircraft toward their targets.
On May 4th, after a P-2 located the forward SAM-picket line of British ships, two Super Etendards of the 2nd Attack Squadron took off from Rio Grande airbase, preceded by a KC-130 tanker. Their primary targets were the British carriers, but any major RN warship would do. Exocet, the archetype of Western heavy antiship missiles to this day, was about to get its baptism by fire.
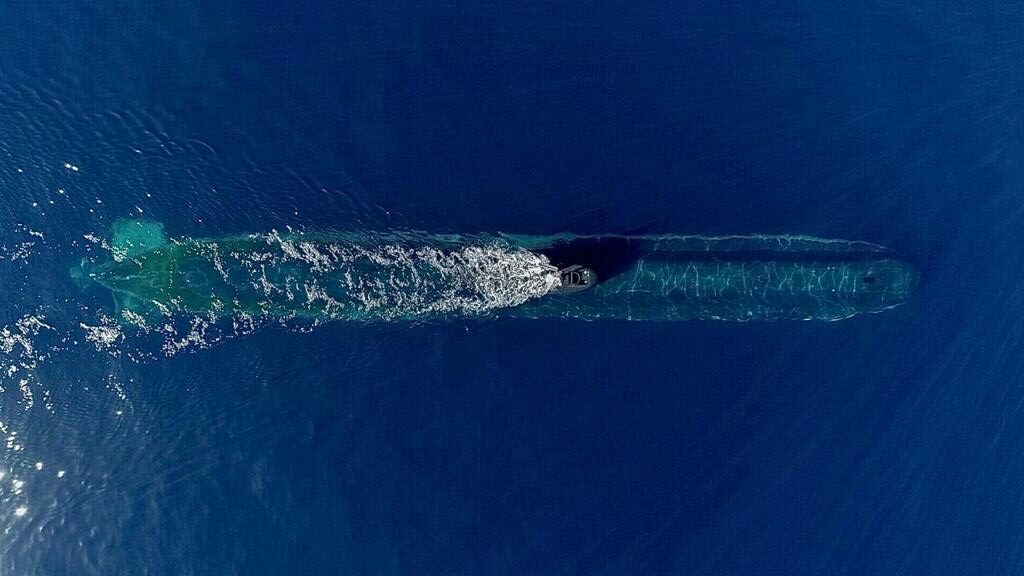 Wolf Pack
What if the remaining Argentine submarines were fully operational at the start of the Falklands War?
ARA San Luis, Salta and the recently re-activated ARA Santiago del Estero (sister to the scuttled Santa Fe) have re-deployed to the East of the Falklands to try and engage and sink the British aircraft carriers.
The UK Task Group has retired to the East of the Falklands for refueling and maintenance during the night, before conducting further operations.
 The Slot
Before British forces landed on the Falklands, extensive reconnaissance of the possible landing sites were conducted by Special Forces and units of the British task force.
The frigate HMS Alacrity surveyed the entrance to Falkland Sound, primarily to confirm the navigability for large ships (especially the large landing ships of the task force) and to determine if the Argentines had mined the channel or had other surprises in lay.
The RN task force needed to verify the hydrographic data for Falkland Sound, and to determine if the Argentines had mined the northern entrance to the straits. To do that, Alacrity had to make a South-to-North transit of Falkland Sound – and brave all the threats that could lurk at this narrow passage…
 Pebble Island Raid
Pebble Island lies just to the north of West Falkland. Besides a small settlement of about 25 souls and sheep, there was a short grass airfield on the island.
Upon occupation, the Argentines moved two detachments of short take-off ground attack aircraft (IA.58 Pucara and T-34 Mentor) to the airfield. Despite the kill tallies already racked up by the RN’s Sea Harriers and SAM destroyers, air superiority over the islands was still hotly contested daily (particularly as most Sea Harriers were busy guarding the fleet and so could not afford to establish permanent CAPs over the islands). So once British soldiers were on the ground, if left unmolested these ground attack aircraft could do grave harm to them in the barren terrain of the Falklands.
Partially for these reasons, the British High Command ordered the 22nd SAS Regt to conduct a pre-emptive raid on the airfield, long before the Royal Marines and their amphibious ships arrived. The SAS had been originally forged in Axis airfield-busting raids during the campaign for North Africa in WW2, so for the 45 tasked members of D squadron this mission was truly a return to their roots.
 Operation Sutton
With the Falklands Sound cleared and nearby threats eliminated, the main British landing force was now able to disembark. The task force sailed into San Carlos waters during the early hours of May 20th, and conducted an unopposed landing on 3 beaches, managing to offload the majority of 3rd Commando Brigade.
There was light resistance from surviving local Argentine units, but these were suppressed by Special Forces teams landing earlier that evening against Fanning Head.
News of the landings reached Argentina, and as expected they caused an immediate and massive reaction. The majority of surviving and available air assets were tasked with an all-out attack on the British landing force. While most of the troops were on the ground, most of their supplies and heavy equipment were still on the big amphib and cargo ships; without them, their chances of defeating the Argentinian occupying forces were slim. And by necessity, until they finished unloading, the ships and their escorts were sitting ducks.
For the British ships and forces in San Carlos, May 20th was the easy part. The next day would be a whole other story: virtually everything in the Argentine inventory that could fly and bomb was coming for them.
 Death Valley
As expected, the Argentinian air force (and naval air-arm) threw everything they could at the British landing forces at San Carlos, beginning from the morning of May 21st. Early results were less than hoped, with some ships damaged but only one sunk (HMS Ardent) and none of the big amphibs taken out of action. This was due to a combination of factors:
- Due to the long distances, even with air refueling most Arg aircraft had very limited time-over-target available. That meant very limited time margins to detect surface targets, prioritize, and line up for an effective attack (and evaluate damage, and re-attack if necessary). Even something as basic as lighting up afterburner to evade an incoming missile (prior to attack) may well deplete the last fuel reserves and force an attacking aircraft to choose between aborting and returning to base, or pressing with the attack and (regardless of its success) ditching afterwards, short of fuel. In different cases, both choices were taken.
- The anti-air defences put up by British forces in the landing area were simply murderous. Sea Dart and Seawolf were both highly capable SAM systems (when they worked) and both racked up repeated kills, and additional Rapier SAM launchers were rapidly deployed on the beachhead. But it was really the curtain of anti-aircraft artillery, everything from infantry rifles all the way to ships’ main guns firing airburst rounds, that created a seemingly impenetrable wall of fire for the Argentinian pilots to fly through.
- Finally, Sea Harriers from the two RN carriers were able to mount both standing CAP patrols and deck-launched intercepts, and took a heavy toll on the attacking aircraft, using both their powerful 30mm cannons and the brand-new AIM-9L Sidewinder missiles that, for the first time, allowed all-aspect shots and thus conferred to them a decisive advantage.
Due to exceptionally bad weather on the 22th, air attacks on that day were postponed. This gave both sides time to rest (and to the RN landing force to unload more troops and material in peace), evaluate what worked and what didn’t, and prepare for the next day.
May 23rd dawned with much better weather, and Argentina’s air armada set out for Round 2. British defences were more extensive and better prepared now, and the Argentinian crews were knowingly stepping into air defences that Hanoi, just 10 years ago, would have envied. Some of these brave pilots would not be coming back.
 Independence Day
I think the Argentine pilots are showing great bravery, it would be foolish of me to say anything else. — John Nott, British Defence Minister
May 25th was the Argentine Independence Day, a celebration day for the country. Thus it became important for general Galtieri’s government to demonstrate a significant military success in the Falklands operation, if only for this day. Undeterred by the relatively poor results of the attacsk during the last few days, the air force was instructed to perform an all-out attack on the British forces, disregarding losses.
As the San Carlos landing was finishing up by this point, the attacks this time were split between amphib ships still in the valley, warships and logistics assets stationed outside the Sound, and other ships still east of the islands (incl. the carrier group).
HMS Coventry (a Type 42 destroyer) was stationed off Pebble Island and close-covered by HMS Broadsword, a Type 22 frigate. Positioned there to provide coverage for the amphib force, they would draw a major portion of the attack on that day.
To the East of the Falklands remained the bulk of the RN Task Group, including the Hermes & Invincible; with them was a number of Merchant ships including the MV Atlantic Conveyor, carrying much needed heavy-lift helicopters and replacement Harrier GR.3s.
The Argentinian pilots were explicitly instructed to destroy one or more significant British assets, or else not bother returning. On their national celebration day, they had nothing to lose…
 Cry Havoc – Bluff Cove
Raging for revenge, with Ate by his side come hot from hell, shall in these confines with a monarch’s voice cry ‘Havoc!’, and let slip the dogs of war. – Julius Caesar, William Shakespeare
By the 1st of June, British ground forces at Falklands were bolstered by the arrival of 5000 new troops of the 5th Infantry Brigade. Major General Jeremy Moore now had sufficient force to start planning a full-scale assault on Port Stanley, the main stronghold of the Argentinian garrison.
This fresh arrival was observed by the Arg forces, and swift pre-emptive action was decided before the bridgehead was established, to give their troops at Stanley more time to hold their ground. By now the Argentinian airforce (FAA) had been decimated by its heavy losses, particularly during the San Carlos strikes. But the surviving crews were now bloodied veterans, and they could still mount one last big air offensive.
On June 8th, as the new reinforcements were being transferred by the amphibious force at Bluff Cove ashore, the ships came under air attack by A-4s of the 5th Air Brigade. British intelligence estimates assumed that the FAA, having suffered grave losses in the weeks before, would be unable to substantially interfere with the landing operation. They were about to be proven deadly wrong.
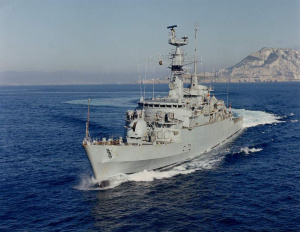
 Call for Fire
The Royal Navy routinely shelled Argentine positions around Port Stanley, during the attack on the Two Sisters Mountain Range Royal Marines met stiff opposition from well dug in Argentine troops and again called for Fire Support from the Royal Navy.
HMS Glamorgan has returned on station from Replenishment of Stores and Fuel, but as the Falklands Campaign reached its climax when both ships were recalled to support the Royal Marines fighting the Battle of Two Sisters.
During the morning of Saturday 12 June, Glamorgan was engaged by one Exocet missile fired from a land-based launcher.
 Bonus #1: The Empire Strikes Back
HMS Ark Royal, an Audacious-class aircraft carrier, was Britain’s last catapult flat-top to this day. Originally a WW2-era design, she was heavily modified (including the first-ever angled flight deck installed on a carrier) to operate Phantoms, Buccaneers and Gannet-AEWs throughout the 60s and 70s. She was retired in 1979.
In this hypothetical scenario, a service-life extension program (SLEP) in the mid/late-70s has granted a few more years of useful service to the old ship, and allowed her to join Hermes in lieu of the never-built Invincible in the Falklands campaign. As part of the SLEP, her obsolete Gannet-AEW aircraft have been replaced by modern E-2C Hawkeyes, and Seacat SAMs have been fitted to improve terminal defences.
The Ark Royal CVBG is now in the area of operations, and has been ordered to conduct strikes on the Argentine airfields in the Falkland islands.
This scenario has been enhanced with many “Fog of War” aspects; therefore expect the unexpected…
 Bonus #2: Operation Mikado
The Exocet strike that sunk HMS Sheffield confirmed the worst fears of the RN about the capabilities of this weapon, and its potential to disrupt (or even shut down entirely) operation Corporate. As a result, neutralizing this threat became a high priority, and several courses of action were considered.
One of them, called Operation Mikado, was a proposed plan to use Special Forces to infiltrate the Rio Grande airbase (in mainland Argentina) and destroy the Super Etendard aircraft hosted there together with their Exocet missiles. The initial concept was to land two C-130 Hercules on the runway, loaded with SAS troops, and perform an “Entebbe-style” lightning raid to destroy the aircraft & missiles. After the raid, surviving SAS members were to make their own way back via Chile if the Hercules were destroyed.
The plan was given an initial green light with caution, and as preparation for the raid, an advance SAS team landed on the Tierra del Fuego peninsula by Sea King helicopter, in order to recon the area and evaluate the feasibility of the C-130 plan.
Their report was mostly negative, and together with other developments Operation Mikado was shelved.
But what if other options on the table had been approved…?
- What is 'Command'?
- Professional, Academic & Student Edition
- What the Press Say
- Customer Testimonials
- Scenario & Add-On Downloads
- Mega-FAQ
- Official Forum
- Contact Us
- Links
-
- What is 'Harpoon'?
- Waypoint Magazine
- Harpoon3.6 1937-1949
(WW2)
Database & Scenarios - Harpoon3.6 1950-1964
(Colonial Wars)
Database & Scenarios - Harpoon3.6 1965-1979
(Missile Age)
Database & Scenarios - Harpoon3.6 1980-2015
(DB2000)
Database & Scenarios -
Archives
- February 2024
- December 2023
- October 2023
- September 2023
- August 2023
- July 2023
- May 2023
- March 2023
- January 2023
- December 2022
- November 2022
- October 2022
- September 2022
- August 2022
- March 2022
- November 2021
- October 2021
- September 2021
- August 2021
- May 2021
- April 2021
- March 2021
- October 2020
- May 2020
- March 2020
- February 2020
- January 2020
- November 2019
- October 2019
- September 2019
- May 2019
- March 2019
- February 2019
- January 2019
- November 2018
- October 2018
- September 2018
- July 2018
- May 2018
- March 2018
- February 2018
- January 2018
- November 2017
- October 2017
- September 2017
- July 2017
- May 2017
- April 2017
- March 2017
- February 2017
- January 2017
- December 2016
- November 2016
- October 2016
- September 2016
- August 2016
- July 2016
- May 2016
- April 2016
- March 2016
- February 2016
- January 2016
- December 2015
- October 2015
- September 2015
- August 2015
- July 2015
- June 2015
- May 2015
- April 2015
- March 2015
- February 2015
- January 2015
- December 2014
- November 2014
- October 2014
- September 2014
- August 2014
- July 2014
- June 2014
- May 2014
- April 2014
- March 2014
- February 2014
- January 2014
- December 2013
- November 2013
- October 2013
- September 2013
- August 2013
- July 2013
- June 2013
- May 2013
- April 2013
- February 2013
- January 2013
- December 2012
- October 2012
- August 2012
- July 2012
- April 2012
- January 2012
- November 2011
- October 2011
- September 2011
- July 2011
- May 2011
- April 2011
- March 2011
- February 2011
- December 2010
- November 2010
- October 2010
- August 2010
- June 2010
- May 2010
- April 2010
- March 2010
- February 2010
- January 2010
- December 2009
- November 2009
- October 2009
- September 2009
- August 2009
- July 2009
- June 2009
- May 2009
- April 2009
- February 2009
- December 2008
-
Recent Posts
Main Menu
Webshop
BUY at MatrixGamesBUY on Steam
BUY on Humble store
